VMware Tutorial for Beginners
VMware virtualization technology is changing the landscape of IT infrastructure today. Organizations can maximize their hardware use/application, therefore significantly reducing IT costs, as well as streamlined operational performance. Whether you are an IT professional seeking to advance your career or an enterprise system administrator looking to become proficient in enterprise virtualization technology, it is vital to understand VMware technologies in a cloud-first mindset.
This complete VMware tutorial for beginners address the complete spectrum of virtualization technologies, from introductory virtualization concepts to advanced management. Do you want to become a VMware certified professional? Download our complete VMware course syllabus, complete with structured learning paths, live labs and expert instruction.
Introduction to VMWare Virtualization
VMware virtualization allows the creation of multiple VMs – each with independent OS and applications – on a single physical server. This technology offers many benefits:
- Hardware Consolidation – Multiple servers on a single physical server.
- Resource Optimization – CPU, Memory, and Storage consumption.
- Cost Reduction – Hardware, power, and cooling expenses.
- Disaster Recovery Improvement – Backup and recovery processes.
- Improved Scalability – Easily provision new VMs.
Recommended: VMware Course Online.
Core Components and Concepts
The entire VMware ecosystem is built on a few core concepts and products.
- Virtual Machine (VM): A VM is a software representation of a physical computer. It has its own virtual CPU, memory, hard disk, and network interface. VMs are able to operate completely independently of other VMs on the same physical host.
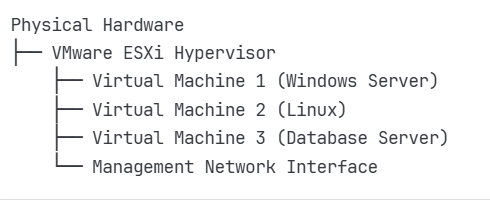
- Hypervisor (VMware ESXi): This is the beginning point of virtualization software. A hypervisor is a thin software layer that is hosted directly on physical server hardware (bare-metal hypervisor).
- Host: The physical server that the VMware hypervisor is installed on is referred to as a host. A single host can run many VMs.
- vSphere: vSphere is VMware’s complete virtualization solution. vSphere consists of a suite of products (including the ESXi hypervisor) plus the vCenter Server management interface, and is designed for enterprise-level virtualization of data centers.
- vCenter Server: This is the centralized management utility that allows an administrator to manage many ESXi hosts, and all of the VMs running on them, from a single interface. vCenter Server provides advanced capabilities such as vMotion, High Availability (HA), and Distributed Resource Scheduler (DRS).
Main Features and Technologies in VMWare
VMware has continued to successfully grow in the enterprise space due to the extensive features it offers.
- vMotion: This technology enables the migration of a running VM from one ESXi host to another without any interruption to the service. It can be used for maintenance, load balancing, and hardware upgrades.
- High Availability (HA): A feature that protects against host failure. If an ESXi host fails in a cluster, HA automatically powers up the VMs from that host in other members of the cluster, protecting the business.
- Distributed Resource Scheduler (DRS): DRS is an intelligent load-balancing tool. Using vMotion, DRS continuously monitors the resource utilization of hosts in the cluster and will automatically migrate VMs amongst the hosts in the cluster to ensure that the hosts are equally balanced, avoiding resource contention.
- Snapshots: A snapshot is a point-in-time copy of the state of a VM. Snapshots retain all VM memory, settings, and disk data. Snapshots are great for setting up a temporary “restore point” before undertaking a risky operation, such as a software update.
- VMware Tools: A suite of utilities and drivers that must be installed inside of the guest operating system within a VM (virtual machine). These tools improve performance of the VM (virtual machine) and management features such as graceful shut down and time synchronization between the host and guest.
VMware Tools Installation:
# Mount VMware Tools CD (Linux)
mount /dev/cdrom /mnt/cdrom
cp /mnt/cdrom/VMwareTools-*.tar.gz /tmp/
cd /tmp
tar -xzf VMwareTools-*.tar.gz
cd vmware-tools-distrib
./vmware-install.pl
# Windows installation
# VM → Guest → Install/Upgrade VMware Tools
# Follow installation wizard
Open VM Tools (Modern Alternative):
# Install Open VM Tools on Ubuntu/Debian
apt-get update
apt-get install open-vm-tools open-vm-tools-desktop
# Install on CentOS/RHEL
yum install open-vm-tools open-vm-tools-desktop
# Verify installation
systemctl status vmtoolsd
Learn the Basics: Cloud Computing Online Training.
Storage and Networking Concepts
VMware has its own concepts for the management of storage and networking resources.
- Datastores: A datastore is a logical representation of physical storage. A datastore is where VM files are stored, such as virtual disk and configuration files. Datastores can be created on many different types of physical storage including local disk, Storage Area Networks (SANs), and Network Attached Storage (NAS).
- VMFS (Virtual Machine File System): This is VMware’s proprietary clustered file system that formats datastores. It allows multiple ESXi hosts to read and write concurrently to the same datastore.
- Virtual Switches: A virtual switch is software that connects VMs to the physical network. There are two primary types of Virtual Switch:
- Standard Virtual Switch: This virtual switch manages the networking for a single ESXi host.
- Distributed Virtual Switch (VDS): This vSwitch allows centralized networking management for all hosts in a vCenter cluster. The use of a VDS simplifies the networking configuration and management.
Additional Benefits of VMware Virtualization
Business Benefits:
- Decreased total cost of ownership (TCO)
- Faster application times with self-service
- Improved business continuity
- Improved isolation for increased security
- Ease for IT management
Technical Benefits:
- Hardware abstraction layer
- Migration, live migration
- Snaps and clones
- Resource pooling and allocation
- Centralized management platform
Installing and Basic Configuration
The typical route to gain access to using VMware in an enterprise environment is by creating a vSphere cluster.
- Install ESXi: Install the ESXi hypervisor on one or more physical servers (aka hosts). You can install ESXi by booting from a USB flash drive that contains the ESXi installer ISO.
- Install vCenter Server: Deploy a vCenter Server Appliance (VCSA) to one of the ESXi hosts. The VCSA is a pre-negotiated Linux-based virtual machine.
- Add Hosts to vCenter: Once vCenter Server has been created and is up and running, use the web client of vCenter Server to add the ESXi hosts to its inventory. You can then now manage the ESXi hosts from a single console.
- Create a Cluster: If you want to enable the advanced features of VMware such as HA and DRS, create a cluster and add your hosts to the cluster.
- Storage and Networking Configuration: You will need to create datastores through your storage capacity and your virtual switches to allow the VMs communicate with each other and the external network.
- Creating VMs: You can create new virtual machines and start deploying operating systems and applications using the vCenter Server.
Upskill: AWS DevOps course online.
VMware Architecture Overview
The VMware architecture consists of a few major components:
Hypervisor Layer (ESXi):
Management Layer (vCenter):
- Management platform
- Scheduling resource and performance optimization
- Configuration of high availability
- Monitoring performance and sending alerts
- Enforcing security policies
VMware Product Portfolio Overview
Core VMware Products
VMware vSphere Suite:
- ESXi – Bare-metal hypervisor.
- vCenter Server – Centralized management platform.
- vSphere Client – Web-based interface for management.
- vMotion – Move a virtual machine while it is powered on.
- Storage vMotion – Move a virtual machine storage without down time.
VMware Cloud Products:
- VMware Cloud on AWS – hybrid cloud
- VMware vRealize Suite – cloud management
- VMware NSX Software-defined Networking
- VMware vSAN Software-defined Storage
VMware Desktop – Products:
- VMware Workstation Pro Desktop virtualization
- VMware Fusion Mac virtualization
- VMware Horizon Virtual Desktop Infrastructure (VDI)
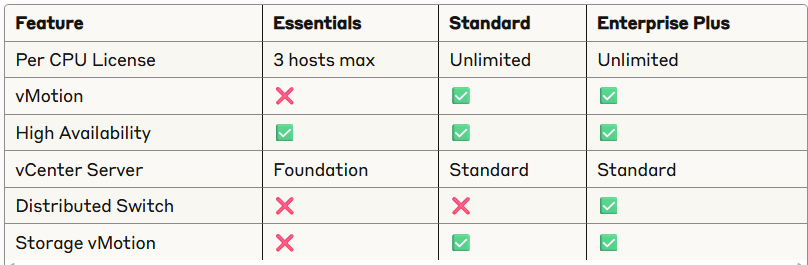
VMware Licensing Models
VMware vSphere Editions:
VMware ESXi Installation and Configuration
ESXi System Requirements
Minimum hardware requirements:
- CPU: 64-bit x86 processor, with at least 2 cores
- Memory: 8 GB RAM minimum (16 GB recommended)
- Storage: 32 GB for ESXi installation (includes boot disk)
- Network: Gigabit Ethernet adapter
- Other: Hardware virtualization support (i.e. Intel VT-x, AMD-V)
Supported hardware:
- Check using VMware Hardware Compatibility List (HCL)
- Verify CPU compatibility for the specific ESXi version
- Check BIOS/UEFI firmware support (e.g. for UEFI)*
- Check compatibility for storage and/or storage controller
ESXi Installation Steps
Pre-Installation Steps:
- Download ESXi ISO image from VMware website.
- Create bootable media (e.g. USB flash or DVD).
- Configure server BIOS/UEFI settings.
- Enable virtualization in BIOS (if applicable).
- Set boot order priority for installation media.
Installation Steps:
Boot from ESXi installation media
- Select “ESXi-7.0.0-XXXXXX-standard Installer”
- Accept End User License Agreement (EULA)
- Select installation disk
- Select keyboard layout
- Set root password minimum 7 characters
- Confirm installation settings
- Install and Reboot
Post Install Configuration:
Configure management network with DCUI (Direct Console User Interface)
- Press F2 at ESXi console
- Enter root credentials
- Go to Configure Management Network
- Set the Network Adapters, IP Configuration, DNS Configuration, etc..
- Apply configuration and restart management network
ESXi Network Configuration
Management Network Setup:
# Via ESXi Shell/SSH
esxcli network ip interface ipv4 set -i vmk0 -I 192.168.1.100 -N 255.255.255.0 -t static
esxcli network ip route ipv4 add -g 192.168.1.1 -n default
# Set DNS servers
esxcli network ip dns server add -s 8.8.8.8
esxcli network ip dns server add -s 8.8.4.4
# Set hostname
esxcli system hostname set –fqdn=esxi01.company.local
Virtual Switch Configuration
# Create standard virtual switch
esxcli network vswitch standard add -v vSwitch1
# Add uplink to virtual switch
esxcli network vswitch standard uplink add -u vmnic1 -v vSwitch1
# Create port group
esxcli network vswitch standard portgroup add -p “Production VMs” -v vSwitch1
# Set VLAN ID for port group
esxcli network vswitch standard portgroup set -p “Production VMs” -v 100
ESXi Storage Configuration
Local Storage Configuration:
# List available storage devices
esxcli storage core device list
# Create a VMFS datatore
vmkfstools -C vmfs6 -S Datastore1 /vmfs/devices/disks/naa.xxxxxxxxxxxxx:1
# Extend existing datastore
vmkfstools -Z /vmfs/devices/disks/naa.xxxxxxxxxxxxx:2 /vmfs/volumes/Datastore1/
NFS Storage Configuration:
# Mount NFS datastore
esxcli storage nfs add -H 192.168.1.200 -s /nfs/vmware_storage -v NFS_Datastore1
# Mount NFS 4.1 datastore
esxcli storage nfs41 add -H 192.168.1.200 -s /nfs/vmware_storage -v NFS41_Datastore1
Recommended: Azure DevOps Course Online.
VMware vCenter Server Management
vCenter Server Deployment Methods
vCenter Server Appliance (VCSA):
- Linux-based virtual appliance
- Web-based management interface
- Faster deployment
- Better stability & performance
- Recommended deployment method
vCenter Server on Windows:
- Windows Server based installation.
- Legacy deployment method
- Licensing costs
- More elaborate maintenance
VCSA Deployment Steps
Stage 1: Deploy OVF Template
# Download VCSA ISO and mount
# Run installer: vcsa-ui-installer/win32/installer.exe
# Deployment Configuration:
ESXi_Host: 192.168.1.100
VM_Name: vCenter-Server
Root_Password: VMware123!
Network: VM Network
IP_Address: 192.168.1.150/24
Gateway: 192.168.1.1
DNS: 8.8.8.8
Stage 2: Set Up vCenter Server
#vCenter Server Configuration:
SSO_Domain: vsphere.local
SSO_Username: administrator@vsphere.local
SSO_Password: VMware123!
Database_Type: Embedded PostgreSQL
Enable_SSH: Yes – (to troubleshoot)
NTP_Server: pool.ntp.org
vCenter Server Set Up
Single Sign-On (SSO) Configuration:
// Create new SSO domain
{
“domain_name”: “company.local”,
“domain_type”: “LOCAL_OS_DOMAIN”,
“authentication_type”: “PASSWORD”
}
// Add identity source (Active Directory)
{
“name”: “company.local”,
“domain”: “company.local”,
“alias”: “COMPANY”,
“type”: “ACTIVE_DIRECTORY”,
“details”: {
“primary_url”: “ldap://dc01.company.local:389”,
“base_dn”: “DC=company,DC=local”
}
}
Datacenter and Cluster Creation:
# PowerCLI commands for datacenter setup
Connect-VIServer -Server vcenter.company.local -User administrator@vsphere.local
# Create datacenter
New-Datacenter -Location (Get-Folder -NoRecursion) -Name “Primary Datacenter”
# Create cluster
New-Cluster -Location (Get-Datacenter “Primary Datacenter”) -Name “Production Cluster”
# Add ESXi hosts to cluster
Add-VMHost -Name esxi01.company.local -Location (Get-Cluster “Production Cluster”) -User root -Password VMware123!
vCenter Server Services Management
Essential vCenter Services:
- VMware vCenter Server – Core management service
- VMware vSphere Profile-Driven Storage Service – Storage policy service
- VMware vCenter Single Sign-On – Authentication service
- VMware vSphere ESX Agent Manager – ESXi agent management
- VMware vCenter Inventory Service – Object inventory management
Service Management Commands:
# Check service status
service-control –list
service-control –status vmware-vpxd
# Start/Stop/Restart services
service-control –start vmware-vpxd
service-control –stop vmware-vpxd
service-control –restart vmware-vpxd
# Check service logs
tail -f /var/log/vmware/vpxd/vpxd.log
VMFS Datastore Management
VMFS Datastore Creation:
# Create VMFS6 datastore via ESXi shell
- Identify available disk
esxcli storage core device list
- Create partition table
partedUtil setptbl /vmfs/devices/disks/naa.xxxxx gpt “1 2048 204800 AA31E02A400F11DB9590000C2911D1B8 0”
- Create VMFS filesystem
vmkfstools -C vmfs6 -S Production_Datastore /vmfs/devices/disks/naa.xxxxx:1
Datastore Operations:
# PowerCLI datastore management
# Extend datastore
$Datastore = Get-Datastore “Production_Datastore”
$VMHost = Get-VMHost “esxi01.company.local”
# Add extent to existing datastore
New-DatastoreCluster -Name “Storage_Cluster” -Location (Get-Datacenter)
Recommended: All Trending Software Courses.
Conclusion
VMware virtualization technology is an integral component of today’s enterprise IT infrastructure. It allows organizations to create, manage, and create scalable, efficient, and resilient computing environments. This VMWare tutorial has provided the essential components of VMware administration, including basic ESXi installation, deliverable options and a few advanced capabilities like NSX networking and cloud automation. Get skilled with certification in our VMWare training in Chennai.