
The best practices deployed by experienced object-oriented software engineers are represented by design patterns. Design patterns are approaches to common issues that software developers run across when creating new applications. These answers were discovered by trial and error over a long period of time by numerous software engineers.
In this article, you can learn Java Design Patterns with Best Practices for Designing and Implementing Java Applications. Accelerate your design pattern skills by enrolling in our Java Training in Chennai at SLA Institute.
Table of Contents
- Design Patterns in Java
- Applications of Design Pattern
- Types of Design Patterns
- Factory Pattern
- Builder Pattern
- Bridge Pattern
- Composite Pattern
- Singleton Pattern
- Facade Pattern
- Mediator Pattern
- Flyweight Pattern
- Proxy Pattern
- Interpreter Pattern
Design Patterns in Java
The book Design Patterns – Elements of Reusable Object-Oriented Software, published in 1994, introduced the idea of design patterns in software development. Richard Helm, Erich Gamma, John Vlissides, and Ralph Johnson all contributed to it.
Gang of Four (GOF) is the collective pen name for these writers. These writers assert that the following object oriented design concepts serve as the foundation for design patterns.
- Programmed to an interface rather than being implemented
- Give preference to object construction over the inheritance
Application of Design Pattern
There are two main applications for design patterns in software development.
Common Platform for Developers
Design patterns are suited to a certain situation and provide a common language like Python and Java. For instance, the use of a single object is indicated by the singleton design pattern, so all developers who are familiar with it will use a single object and be able to recognize it in a program.
Best Practices
Design patterns have been developed over a considerable amount of time and offer the best practices to certain issues that arise during the development of software. Unexperienced engineers can learn software design more quickly and easily by becoming familiar with these patterns.
Types of Design Patterns
There are 23 design patterns, based on the design pattern sourcebook Design Patterns – Elements of Reusable Object-Oriented Software. Three categories—creational, structural, and behavioral patterns—can be used to group these patterns. We’ll also talk about the popular design pattern categories: Design patterns for J2EE.
Creational Patterns
Instead of instantiating objects directly with the new operator, these design patterns offer a mechanism to generate things while concealing the creation logic. As a result, the program has more freedom to choose which objects should be created for a particular use case.
Structural Patterns
These design patterns deal with the composition of classes and objects. The concept of inheritance is used to specify how to combine objects to create new functions and to construct interfaces.
Behavioral Patterns
These design patterns have a specific focus on the interaction of items.
J2EE Patterns
These design patterns specifically concentrate on the presentation tier of J2EE. These patterns have been noticed by Sun Java Centre.
Factory Pattern
One of the most popular design patterns for Java is the factory pattern. Given that it offers one of the greatest processes for creating an object, this kind of design pattern is a creational pattern. Using a standard interface, we generate objects in the factory design without revealing the creation logic to the client. We also use this design to refer to recently created items.
Implementation
We’ll create classes that implement the Shape interface as well as the interface itself. A factory class called ShapeFactory is defined in the next phase.
Our demo class, FactoryPatternDemo, will use ShapeFactory to get a Shape object. It will pass ShapeFactory information (CIRCLE, RECTANGLE, or SQUARE) to get the appropriate kind of object.
Step 1: Create an Interface
Shape.java
public interface Shape
{
void draw();
}
Step 2: Now, create concrete classes to implement the same interface
Rectangle.java
public class Rectangle implements Shape
{
@Override
public void draw() {
System.out.println(“Inside Rectangle::draw() method.”);
}
}
Square.java
public class Square implements Shape
{
@Override
public void draw() {
System.out.println(“Inside Square::draw() method.”);
}
}
Circle.java
public class Circle implements Shape
{
@Override
public void draw() {
System.out.println(“Inside Circle::draw() method.”);
}
}
Step 3: Using the above data, construct a factory to make concrete class objects.
ShapeFactory.java
public class ShapeFactory {
public Shape getShape(String shapeType){
if(shapeType == null){
return null;
}
if(shapeType.equalsIgnoreCase(“CIRCLE”)){
return new Circle();
} else if(shapeType.equalsIgnoreCase(“RECTANGLE”)){
return new Rectangle();
} else if(shapeType.equalsIgnoreCase(“SQUARE”)){
return new Square();
}
return null;
}
}
Step 4: To obtain concrete class objects, use the Factory and pass parameters like type.
FactoryPatternDemo.java
public class FactoryPatternDemo {
public static void main(String[] args) {
ShapeFactory shapeFactory = new ShapeFactory();
Shape shape1 = shapeFactory.getShape(“CIRCLE”);
shape1.draw();
Shape shape2 = shapeFactory.getShape(“RECTANGLE”);
shape2.draw();
Shape shape3 = shapeFactory.getShape(“SQUARE”);
shape3.draw();
}
}
Step 5: Check the output
Inside Circle::draw() method.
Inside Rectangle::draw() method.
Inside Square::draw() method.
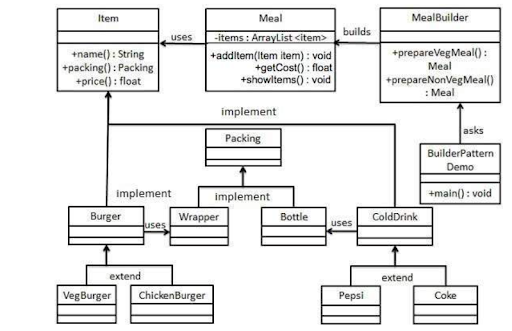
Builder Pattern
By using small items and a step-by-step procedure, a builder pattern is used to generate a complex entity. Given that it offers one of the greatest processes for creating an object, this kind of design pattern is a creational pattern.
Piece by piece, the finished object is built by a class named Builder. This builder is not reliant on other things.
Implementation
We’ve thought about the business case for a fast-food establishment where a burger and a cold beverage may be a normal lunch. A wrapper will be used to package the burger, which may be either a chicken or vegetarian option. Coke or Pepsi could be a cold beverage; it will be packaged in a bottle.
In addition to concrete classes that implement the Packing interface, which will represent how food items are wrapped, we’ll also develop concrete classes that implement the Item interface, which will represent food items like hamburgers and cold beverages. A burger, for instance, would be wrapped in a wrapper, and a cold beverage would be housed in a bottle.
The next step is to create a class called Meal that contains an ArrayList of Items and a MealBuilder that combines Items to create different kinds of Meal objects. Our demo class, BuilderPatternDemo, will create a meal using MealBuilder.
Step 1: Make a user interface Food packaging and item representation.
Item.java
public interface Item {
public String name();
public Packing packing();
public float price();
}
Packing.java
public interface Packing {
public String pack(); }
Step 2: Design classes that implement the Packing interface.
Wrapper.java
public class Wrapper implements Packing {
@Override
public String pack() {
return “Wrapper”;
}
}
Bottle.java
public class Bottle implements Packing {
@Override
public String pack() {
return “Bottle”;
}
}
Step 3: Develop abstract classes that implement the item interface and offer the basic features.
Burger.java
public abstract class Burger implements Item {
@Override
public Packing packing() {
return new Wrapper();
}
@Override
public abstract float price();
}
ColdDrink.java
public abstract class ColdDrink implements Item {
@Override
public Packing packing() {
return new Bottle();
}
@Override
public abstract float price();
}
Step 4: Construct concrete classes that extend the classes Burger and ColdDrink.
VegBurger.java
public class VegBurger extends Burger {
@Override
public float price() {
return 25.0f;
}
@Override
public String name() {
return “Veg Burger”;
}
}
ChickenBurger.java
public class ChickenBurger extends Burger {
@Override
public float price() {
return 50.5f;
}
@Override
public String name() {
return “Chicken Burger”;
}
}
Coke.java
public class Coke extends ColdDrink {
@Override
public float price() {
return 30.0f;
}
@Override
public String name() {
return “Coke”;
}
}
Pepsi.java
public class Pepsi extends ColdDrink {
@Override
public float price() {
return 35.0f;
}
@Override
public String name() {
return “Pepsi”;
}
}
Step 5: Create a Meal class with the items described above as its members.
Meal.java
import java.util.ArrayList;
import java.util.List;
public class Meal {
private List<Item> items = new ArrayList<Item>();
public void addItem(Item item){
items.add(item);
}
public float getCost(){
float cost = 0.0f;
for (Item item : items) {
cost += item.price();
}
return cost;
}
public void showItems(){
for (Item item : items) {
System.out.print(“Item : “+item.name());
System.out.print(“, Packing : “+item.packing().pack());
System.out.println(“, Price : “+item.price());
}
}
}
Step 6: Make a MealBuilder class, which will serve as the actual builder used to produce Meal instances.
MealBuilder.java
public class MealBuilder {
public Meal prepareVegMeal (){
Meal meal = new Meal();
meal.addItem(new VegBurger());
meal.addItem(new Coke());
return meal;
}
public Meal prepareNonVegMeal (){
Meal meal = new Meal();
meal.addItem(new ChickenBurger());
meal.addItem(new Pepsi());
return meal;
}
}
Step 7: MealBuider is used by BuiderPatternDemo to illustrate builder patterns.
BuilderPatternDemo.java
public class BuilderPatternDemo {
public static void main(String[] args) {
MealBuilder mealBuilder = new MealBuilder();
Meal vegMeal = mealBuilder.prepareVegMeal();
System.out.println(“Veg Meal”);
vegMeal.showItems();
System.out.println(“Total Cost: ” +vegMeal.getCost());
Meal nonVegMeal = mealBuilder.prepareNonVegMeal();
System.out.println(“nnNon-Veg Meal”);
nonVegMeal.showItems();
System.out.println(“Total Cost: ” +nonVegMeal.getCost());
}
}
Step 8: Check the output
Veg Meal
Item : Veg Burger,
Packing : Wrapper,
Price : 25.0
Item : Coke,
Packing : Bottle,
Price : 30.0
Total Cost: 55.0
Non-Veg Meal
Item : Chicken Burger,
Packing : Wrapper,
Price : 50.5
Item : Pepsi,
Packing : Bottle,
Price : 35.0
Total Cost: 85.5
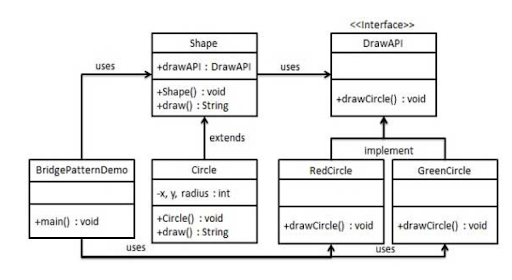
Bridge Pattern
We use a bridge when we need to keep an abstraction’s implementation separate so that it can change independently. This kind of design pattern is a structural pattern because it establishes a bridge structure between the implementation class and abstract class.
Concrete classes utilizing this design can operate independently of interface implementer classes by using an interface that acts as a bridge. Both types of classes can have their structures changed without affecting the other.
By using the same abstract class function but various bridge implementer classes, we may draw a circle in various colors as an example of how to apply the bridge pattern.
Implementation
We have a concrete class called RedCircle that implements the DrawAPI interface and an interface called DrawAPI that serves as a bridge implementer. The shape is an abstract class that makes use of DrawAPI objects. BridgePatternDemo, our demo class, will draw various colored circles using the Shape class.
Step 1: The implementation interface for bridges.
DrawAPI.java
public interface DrawAPI {
public void drawCircle1(int radius, int x, int y);
}
Step 2: Make DrawAPI interface implementer classes that are concrete bridge implementers.
RedCircle.java
public class RedCircle implements DrawAPI {
@Override
public void drawCircle1(int radius, int x, int y) {
System.out.println(“Drawing Circle[ color: red, radius: “+ radius +”, x: ” +x+”, “+ y +”]”);
}
}
GreenCircle.java
public class GreenCircle implements DrawAPI {
@Override
public void drawCircle1(int radius, int x, int y) {
System.out.println(“Drawing Circle[ color: green, radius: “+ radius1 +”, x: ” +x+”, “+ y +”]”);
}
}
Step 3: Using the DrawAPI interface, make a Shape class that is abstract.
Shape.java
public abstract class Shape {
protected DrawAPI drawAPI;
protected Shape(DrawAPI drawAPI){
this.drawAPI = drawAPI;
}
public abstract void draw();
}
Step 4: A concrete class that implements the Shape interface should be created.
Circle.java
public class Circle1 extends Shape {
private int x, y, radius;
public Circle1(int x, int y, int radius, DrawAPI drawAPI) {
super(drawAPI);
this.x = x;
this.y = y;
this.radius = radius;
}
public void draw() {
drawAPI.drawCircle(radius,x,y);
}
}
Step 5: To create circles of various colors, use the Shape and DrawAPI classes.
BridgePatternDemo.java
public class BridgePatternDemo {
public static void main(String[] args) {
Shape redCircle1 = new Circle(100,100, 10, new RedCircle());
Shape greenCircle1 = new Circle(100,100, 10, new GreenCircle());
redCircle.draw();
greenCircle.draw();
}
}
Step 6: Check the output
Drawing Circle1 [color: red, radius: 10, x: 100, 100]
Drawing Circle1 [color: green, radius: 10, x: 100, 100]
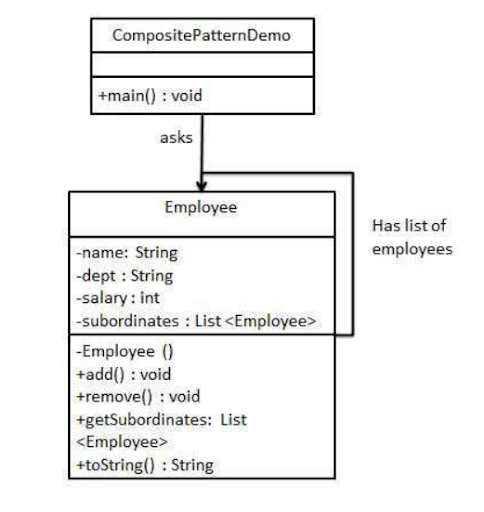
Composite Pattern
When it’s necessary to treat a collection of items similarly to a single object, a composite pattern is used. In order to depict both a part of the hierarchy and the entire hierarchy, composite patterns combine elements into a tree structure. This kind of design pattern falls under the category of a structural pattern because it builds a tree structure out of a collection of elements.
A class containing a collection of its own objects is created using this approach. This class offers methods for changing its collection of identical items.
We will use the example of an organizational hierarchy of employees to explain how to apply the Composite pattern.
Improve your confidence by checking your technical skills through our Java Interview Questions and Answers prepared by SLA experts.
Implementation
We have a class called Employee that serves as a composite class of pattern actor. The Employee class will be used by CompositePatternDemo, our demo class, to add department level structure and print all employees.
Step 1: Create a class for employees with a list of employees’ objects.
Employee.java
import java.util.ArrayList;
import java.util.List;
public class Employee {
private String name;
private String dept;
private int salary;
private List<Employee> subordinates;
// constructor
public Employee1(String name,String dept, int sal) {
this.name = name;
this.dept = dept;
this.salary = sal;
subordinates = new ArrayList<Employee>();
}
public void add(Employee e) {
subordinates.add(e);
}
public void remove(Employee e) {
subordinates.remove(e);
}
public List<Employee> getSubordinates(){
return subordinates;
}
public String toString(){
return (“Employee :[ Name : “+ name +”, dept1 : “+ dept1 + “, salary : + salary+” ]”);
}
}
Step 2: To design and print employee hierarchies, use the Employee class.
CompositePatternDemo.java
public class CompositePatternDemo {
public static void main(String[] args) {
Employee CEO1 = new Employee(“John”,”CEO”, 30000);
Employee headSales1 = new Employee(“Robert”,”Head Sales”, 20000);
Employee headMarketing1 = new Employee(“Michel”,”Head Marketing”, 20000);
Employee clerk1 = new Employee(“Laura”,”Marketing”, 10000);
Employee clerk2 = new Employee(“Bob”,”Marketing”, 10000);
Employee salesExecutive1 = new Employee(“Rich”,”Sales”, 10000);
Employee salesExecutive2 = new Employee(“Robby”,”Sales”, 10000);
CEO1.add(headSales);
CEO1.add(headMarketing);
headSales1.add(salesExecutive1);
headSales1.add(salesExecutive2);
headMarketing1.add(clerk1);
headMarketing1.add(clerk2);
//print all employees of the organization
System.out.println(CEO1);
for (Employee1 headEmployee1 : CEO1.getSubordinates()) {
System.out.println(headEmployee1);
for (Employee1 employee : headEmployee1.getSubordinates()) {
System.out.println(employee);
}
}
}
}
Step 3: Check the output
Employee1 :[ Name : John, dept : CEO, salary :30000 ]
Employee1 :[ Name : Robert, dept : Head Sales, salary :20000 ]
Employee1 :[ Name : Rich, dept : Sales, salary :10000 ]
Employee1 :[ Name : Robby, dept : Sales, salary :10000 ]
Employee1 :[ Name : Michel, dept : Head Marketing, salary :20000 ]
Employee1 :[ Name : Laura, dept : Marketing, salary :10000 ]
Employee1 :[ Name : Bob, dept : Marketing, salary :10000 ]
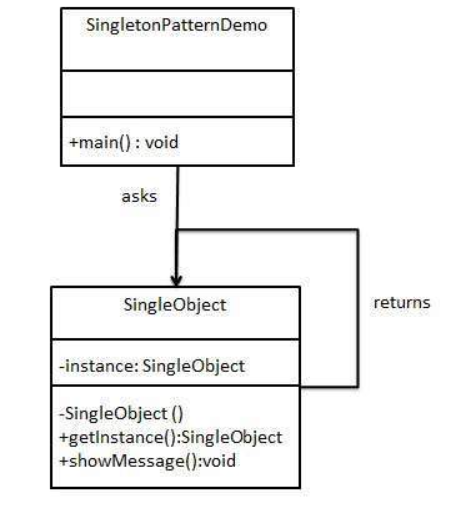
Singleton Pattern
The singleton pattern is one of the most basic design patterns used in Java. Given that it offers one of the greatest processes for creating an object, this kind of design pattern is a creational pattern. In this approach, just one object is created by each class, which also makes sure that no more than one object is created.
It is not necessary to first instantiate this class because it provides a method for accessing the class’s single object immediately.
Implementation
A SingleObject class will be developed. The SingleObject class has a static instance of itself and a private constructor.
A static method is provided by the SingleObject class to return its static instance to the outside world. The SingleObject class will be used by the demo class we use, SingletonPatternDemo, to get a SingleObject object.
Step 1: Establish a Singleton Class
SingleObject.java
public class SingleObject {
private static SingleObject instance1 = new SingleObject();
private SingleObject(){}
public static SingleObject getInstance(){
return instance;
}
public void showMessage(){
System.out.println(“Hello World!”);
}
}
Step 2: Get the one instance of the singleton class’s object.
SingletonPatternDemo.java
public class SingletonPatternDemo {
public static void main(String[] args) {
SingleObject object = SingleObject.getInstance();
object.showMessage();
}
}
Step 3: Check the output
Hello World!
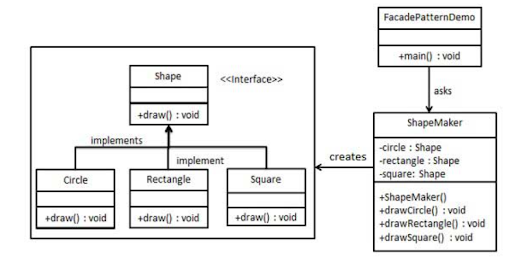
Facade Pattern
The facade pattern provides the customer with an interface through which they can access the system while hiding the complexity of the system. This type of design pattern belongs to the structural pattern group since it adds an interface to an existing system to hide its complexity.
In this design, calls to the methods of pre-existing system classes are delegated while clients are provided with the simplified methods they require from the class.
Implementation
We’ll create classes that implement the Shape interface as well as the interface itself. As a next stage, a facade class named ShapeMaker is defined. The concrete classes are used by the ShapeMaker class to transfer user calls to these classes. Our demo class, FacadePatternDemo, will utilize the ShapeMaker class to display the outcomes.
Step 1: Generate an Interface
Shape.java
public interface Shape {
void draw();
}
Step 2: Develop concrete classes to implement the interface.
Rectangle.java
public class Rectangle implements Shape {
@Override
public void draw() {
System.out.println(“Rectangle::draw()”);
}
}
Square.java
public class Square implements Shape {
@Override
public void draw() {
System.out.println(“Square::draw()”);
}
}
Circle.java
public class Circle implements Shape {
@Override
public void draw() {
System.out.println(“Circle::draw()”);
}
}
Step 3: Create a facade class
ShapeMaker.java
public class ShapeMaker {
private Shape circle;
private Shape rectangle;
private Shape square;
public ShapeMaker() {
circle = new Circle();
rectangle = new Rectangle();
square = new Square();
}
public void drawCircle(){
circle.draw();
}
public void drawRectangle(){
rectangle.draw();
}
public void drawSquare(){
square.draw();
}
}
Step 4: Draw different shapes using the façade.
FacadePatternDemo.java
public class FacadePatternDemo {
public static void main(String[] args) {
ShapeMaker shapeMaker = new ShapeMaker();
shapeMaker.drawCircle();
shapeMaker.drawRectangle();
shapeMaker.drawSquare();
}
}
Step 5: Check the output
Circle::draw()
Rectangle::draw()
Square::draw()
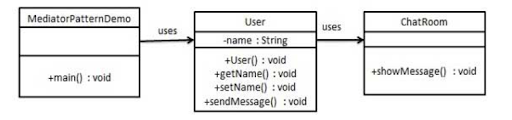
Mediator Pattern
The mediator pattern is employed to simplify communication between several objects or classes. This pattern offers a mediator class that typically manages all interactions between other classes and encourages loose coupling for simple code maintenance. The behavioral pattern category includes the mediator pattern.
Implementation
By using a chat room as an example, where several users can send messages to the chat room and the chat room is responsible for showing the messages to all users, we are illustrating the mediator pattern. Two classes, ChatRoom and User, have been developed. User objects will communicate via the ChatRoom function.
Our demo class, MediatorPatternDemo, will utilize User instances to demonstrate interactivity between them.
Step 1: Create a Mediator Class.
ChatRoom.java
import java.util.Date;
public class ChatRoom {
public static void showMessage1(User user, String message1){
System.out.println(new Date().toString() + ” [” + user.getName() + “] : ” + message1);
}
}
Step 2: Create a user class
User.java
public class User {
private String name;
public String getName() {
return name;
}
public void setName(String name) {
this.name = name;
}
public User(String name){
this.name = name;
}
public void sendMessage(String message){
ChatRoom.showMessage(this,message);
} }
Step 3: Show the exchange of messages between them using the User object.
MediatorPatternDemo.java
public class MediatorPatternDemo {
public static void main(String[] args) {
User robert = new User(“Robert”);
User john = new User(“John”);
robert.sendMessage(“Hi! John!”);
john.sendMessage(“Hello! Hary!”);
}
}
Step 4: Check the output
Fri Mar23 16:05:46 IST 2013 [Robert] : Hi! John!
Fri Mar23 16:05:46 IST 2013 [John] : Hello! Hary!
Flyweight Pattern
The primary objectives of the flyweight pattern are performance improvement, memory footprint reduction, and object creation reduction. This kind of design pattern falls under the category of a structural pattern because it offers strategies for reducing the number of objects while enhancing the application’s object structure.
When no existing object of the same kind can be identified, the flyweight pattern seeks to reuse previously created objects of a similar sort by storing them. By creating simply five items, we will draw 20 circles in various spots to show this pattern. Since there are only 5 colors available, the color attribute is used to see if any Circle objects already exist.
Implementation
A Circle HashMap from ShapeFactory uses the color of the Circle object as the key. When ShapeFactory receives a request to produce a circle of a specific color, it searches its HashMap for the circle object and returns it if it is present. If not, a new object is constructed, saved in the hashmap for later use, and sent back to the client.
Our demo class, FlyWeightPatternDemo, will use ShapeFactory to obtain a Shape object. In order to obtain the needed circle in the specified color, it will pass ShapeFactory information (red, green, blue, black, and white).

Step 1: Create an interface
Shape.java
public interface Shape {
void draw();
}
Step 2: Construct a concrete class that implements the interface.
Circle.java
public class Circle implements Shape {
private String color;
private int x;
private int y;
private int radius;
public Circle(String color){
this.color = color;
}
public void setX(int x) {
this.x = x;
}
public void setY(int y) {
this.y = y;
}
public void setRadius(int radius) {
this.radius = radius;
}
@Override
public void draw() {
System.out.println(“Circle: Draw() [Color : ” + color + “, x : ” + x + “, y :” + y + “, radius :” + radius);
}
}
Step 3: Create a factory to use the provided data to produce actual class objects.
ShapeFactory.java
import java.util.HashMap;
public class ShapeFactory {
// Uncomment the compiler directive line and
// javac *.java will compile properly.
// @SuppressWarnings(“unchecked”)
private static final HashMap circleMap = new HashMap();
public static Shape getCircle(String color) {
Circle circle = (Circle)circleMap.get(color);
if(circle == null) {
circle = new Circle(color);
circleMap.put(color, circle);
System.out.println(“Creating a circle color : ” + color);
}
return circle;
}
}
Step 4: Use the factory to obtain concrete class objects by providing details like colour.
FlyweightPatternDemo.java
public class FlyweightPatternDemo {
private static final String colors[] = { “Red”, “Green”, “Blue”, “White”, “Black” };
public static void main(String[] args) {
for(int i=0; i < 20; ++i) {
Circle circle = (Circle)ShapeFactory.getCircle(getRandomColor());
circle.setX(getRandomX());
circle.setY(getRandomY());
circle.setRadius(100);
circle.draw();
}
}
private static String getRandomColor() {
return colors[(int)(Math.random()*colors.length)];
}
private static int getRandomX() {
return (int)(Math.random()*100 );
}
private static int getRandomY() {
return (int)(Math.random()*100);
}
}
Step 5: Check the output
Creating circle of color : Black
Circle: Draw() [Color : Black, x : 36, y :71, radius :100
Creating circle of color : Green
Circle: Draw() [Color : Green, x : 27, y :27, radius :100
Creating circle of color : White
Circle: Draw() [Color : White, x : 64, y :10, radius :100
Creating circle of color : Red
Circle: Draw() [Color : Red, x : 15, y :44, radius :100
Circle: Draw() [Color : Green, x : 19, y :10, radius :100
Circle: Draw() [Color : Green, x : 94, y :32, radius :100
Circle: Draw() [Color : White, x : 69, y :98, radius :100
Creating circle of color : Blue
Circle: Draw() [Color : Blue, x : 13, y :4, radius :100
Circle: Draw() [Color : Green, x : 21, y :21, radius :100
Circle: Draw() [Color : Blue, x : 55, y :86, radius :100
Circle: Draw() [Color : White, x : 90, y :70, radius :100
Circle: Draw() [Color : Green, x : 78, y :3, radius :100
Circle: Draw() [Color : Green, x : 64, y :89, radius :100
Circle: Draw() [Color : Blue, x : 3, y :91, radius :100
Circle: Draw() [Color : Blue, x : 62, y :82, radius :100
Circle: Draw() [Color : Green, x : 97, y :61, radius :100
Circle: Draw() [Color : Green, x : 86, y :12, radius :100
Circle: Draw() [Color : Green, x : 38, y :93, radius :100
Circle: Draw() [Color : Red, x : 76, y :82, radius :100
Circle: Draw() [Color : Blue, x : 95, y :82, radius :100
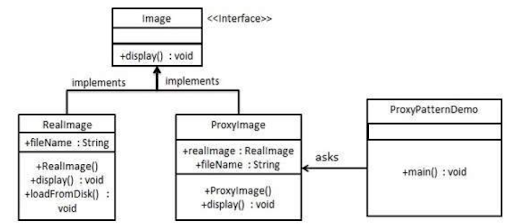
Proxy Pattern
A class represents the functionality of another class in a proxy design. The structural pattern category includes this kind of design pattern.
By creating an object with the original object, we may interface its functioning with the outside world.
Implementation
Concrete classes that implement the Image interface will be developed together with the Image interface. A proxy class called ProxyImage is used to lessen the memory footprint of loading RealImage objects.
Our demo class, ProxyPatternDemo, will use ProxyImage to obtain an Image object that it can load and show as required.
Step 1: Create an interface
Image.java
public interface Image {
void display();
}
Step 2: Create concrete classes to implement the interface.
RealImage.java
public class RealImage implements Image {
private String fileName;
public RealImage(String fileName){
this.fileName = fileName;
loadFromDisk(fileName);
}
@Override
public void display() {
System.out.println(“Displaying ” + fileName);
}
private void loadFromDisk(String fileName){
System.out.println(“Loading ” + fileName);
}
}
ProxyImage.java
public class ProxyImage implements Image{
private RealImage realImage;
private String fileName;
public ProxyImage(String fileName){
this.fileName = fileName;
}
@Override
public void display() {
if(realImage == null){
realImage = new RealImage(fileName);
}
realImage.display();
}
}
Step 3: When necessary, use the ProxyImage to obtain an object of the RealImage class.
ProxyPatternDemo.java
public class ProxyPatternDemo {
public static void main(String[] args) {
Image image = new ProxyImage(“test_10mb.jpg”);
image.display();
System.out.println(“”);
image.display();
}
}
Step 4: Check the output
Loading test_10mb.jpg
Displaying test_10mb.jpg
Displaying test_10mb.jpg
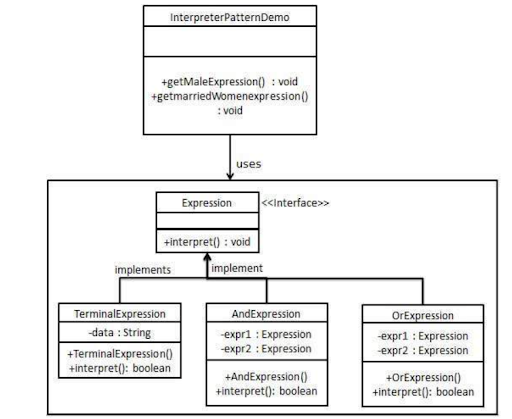
Interpreter Pattern
The interpreter pattern offers a means of assessing a language’s expressiveness or grammar. A behavioral pattern would include this kind of pattern. Implementing an expression interface that instructs to interpret a specific context is required for this pattern. The SQL parsing and symbol processing engines both employ this pattern.
Implementation
The Expression interface will be developed, along with concrete classes that implement it. There is a class defined called TerminalExpression that serves as the primary translator of the context in question. Combinational expressions are made using the classes OrExpression and AndExpression, respectively.
The Expression class will be used by our demo class, InterpreterPatternDemo, to define rules and show how to parse expressions.
Step 1: Create an expression interface
Expression.java
public interface Expression {
public boolean interpret(String context);
}
Step 2: Construct concrete classes that implement the aforementioned interface.
TerminalExpression.java
public class TerminalExpression implements Expression {
private String data;
public TerminalExpression(String data){
this.data = data;
}
@Override
public boolean interpret(String context)
if(context.contains(data)){
return true;
}
return false;
}
}
OrExpression.java
public class OrExpression implements Expression {
private Expression expr1 = null;
private Expression expr2 = null;
public OrExpression(Expression expr1, Expression expr2) {
this.expr1 = expr1;
this.expr2 = expr2;
}
@Override
public boolean interpret(String context) {
return expr1.interpret(context) || expr2.interpret(context);
}
}
AndExpression.java
public class AndExpression implements Expression {
private Expression expr1 = null;
private Expression expr2 = null;
public AndExpression(Expression expr1, Expression expr2) {
this.expr1 = expr1;
this.expr2 = expr2;
}
@Override
public boolean interpret(String context) {
return expr1.interpret(context) && expr2.interpret(context);
}
}
Step 3: Expression class is used by InterpreterPatternDemo to define rules and parse them.
InterpreterPatternDemo.java
public class InterpreterPatternDemo {
//Rule: Robert and John are male
public static Expression getMaleExpression(){
Expression robert = new TerminalExpression(“Robert”);
Expression john = new TerminalExpression(“John”);
return new OrExpression(robert, john);
}
//Rule: Julie is a married women
public static Expression getMarriedWomanExpression(){
Expression julie = new TerminalExpression(“Julie”);
Expression married = new TerminalExpression(“Married”);
return new AndExpression(julie, married);
}
public static void main(String[] args) {
Expression isMale = getMaleExpression();
Expression isMarriedWoman = getMarriedWomanExpression();
System.out.println(“Is John male? ” + isMale.interpret(“John”));
System.out.println(“Julie is a married woman? ” + isMarriedWoman.interpret(“Married Julie”));
}
}
Step 4: Check the output
Is John male? true
Julie is a married woman? True
Conclusion
Design patterns in Java can be applied to more than one design issue, and different design patterns can address the same issue in different ways. There are many design patterns available for them, but selecting the one that is the greatest fit depends on your expertise and comprehension of design patterns.
Additionally, it depends on the existing code that you have. This article provides best practices for using Java’s Design Patterns while designing and implementing Java applications. Take advantage of our Java Training in Chennai to learn about Design Patterns efficiently.